How To Get White Borders On Your Instagram Photos Straight From Lightroom
I switched to adding borders to my photos on Instagram around 2017. I prefer the flexibility having that extra little space between images can provide. It allows sharing more variety in tones & colours side by side. It also just has a nice aesthetic similar to how images appear on paper. I get asked how I add the white borders on my images a few times each year. So I’m putting the steps down here to share the best way I’ve found so far.
1 / Get The Lightroom Plugin
You will need to start by downloading & installing a plugin called LR/Mogrify 2 from The Photographers Toolbox.
Once downloaded, save the app somewhere safe, as Lightroom will always look for that file. So probably with your catalogue or somewhere it won’t be deleted or moved.
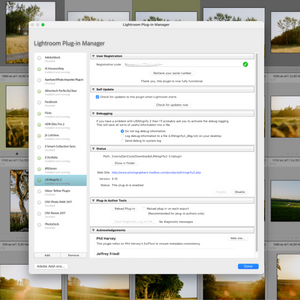
In Lightroom open the Plugin Manager from the File menu and add the new plugin by locating and opening that file.
Once installed it should look something like the below. Mine is a registered version which means unlimited exporting, however, you can try the app out without making a donation/payment but it’s limited to exporting 10 images at once. You can see all the details of the app on their website.
2 / Setup An Export Preset
Once the plugin is installed go to the File, Export menu, and begin to set up a new Export Preset. You should now see in the bottom left window ‘Post-Process Actions’ some options under Mogrify 2. If you don’t see this, try restarting Lightroom after installing the plugin.
You can also use the plugin as part of a Publish Service setup. I have both options created with the same settings so that I can select random images, right-click and export with the border. Or I have smart collections of images under Publish Services such as images edited in the last 30 days, 5-star images, etc so that I can export multiple images without jumping around folders.
The Post-Process Action you want to add from the bottom left window under Mogrify 2 is called Background Canvas. Once you add Background Canvas, it will add two new collapsable option windows on the right side of the screen. One is called Mogrify Configuration (which I don’t ever touch), and one is called Mogrify Canvas which is the crucial part.
The Mogrify Canvas will set the outer size of the exported file. It’s like the canvas in Photoshop and the actual image will be placed within the area of the canvas. The key principle is that the Canvas Size will always be larger than the Image Sizing. This is what creates the outer border. Canvas sized 2000 x 2000 and image sizes 1500 x 1500 then gives you a 250 border on each side.
You can play around with the setting to find what works for you but to explain more here are my specific settings.
3 / My Settings
The screenshot below shows the settings I use, but it’s useful to list them in order of importance and explain them a little.
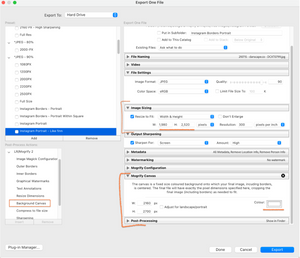
My key settings for exporting any image with a 4:5 white border of 90 pixels.
Mogrify Canvas
You should start here and decide on the overall dimension of the files you want to export. This is the size of the canvas you will set behind the image.
It’s sized in pixel width & height so you will want to get the ratio correct for us on Instagram which for most people means a 4:5 portrait ratio or a 1:1 square ratio as these make the best use of Instagram’s layout.
The maximum width of an image on Instagram is 1080 pixels. The maximum height is 1350 pixels.
So you want to size the canvas either as 1080 pixels wide & 1350 pixels high for the 4:5 portrait canvas, or 1080 wide & high for a square canvas.
Now I actually size the canvas at exactly double these dimensions.
So for the 4:5 portrait canvas, I set the size to 1260 wide & 2700 high.
The reason is that I am just trying to make sure if there is ever an increase in the resolution Instagram permits for images then the files I’ve got or uploaded would be suitably quality. Who knows if that will ever happen but it’s unlikely to be more than a doubling of resolution in one go. It also means I could always use the files for other things.
Finally set the colour to white unless you are going for something a little more out-there.
Image Sizing
Now that you know the dimensions of your background canvas, you can decide how far you want the actual photo to sit within the frame. Or how much of a border you want.
You need to resize to fit your images to a maximum Width & Height measured in pixels. Remember you will have a canvas set to a fixed size so you need to be sure your images stay within the desired size that will give you a border.
My settings are Width - 1980, Height - 2520 (my canvas is set to 2160 x 2700 so doing the sums you can see I get a border of 90 pixels on each side. This applies no matter the crop of the actual photo, it will simply be sized to the largest limit above and therefore have at least a 90-pixel border.
The resolution setting doesn’t matter here as you are setting the number of pixels anyway, and the resolution is just pixels per inch.
File Settings
You are going to want JPG files in sRGB. The quality setting is up to you, I have this set at 90 but you could get away with lower to save file size.
Export Location
Always up to you. I export these images to the same folder all the time and it’s a Google Drive folder so they then are synced and I can access them at any time.
File Naming
Up to you, have fun with it. I like to include the date at the start so I can find images in a big folder based on roughly knowing when I took them.
Video
Doesn’t really matter, but I don’t think this works with videos.
Output Sharpening
I have this set to high sharpening for screen use. I find files that will be viewed small (i.e not full screen on my website), benefit from high sharpening.
Metadata
This is up to you.
Watermarking
Strongly recommend you don’t bother with watermarks on Instagram.
Mogrify Configuration
Just make sure the tick box is selected and that’s it.
Post-Processing
Up to you, can be handy to have the export open up the folder to save searching around.
4 / Share To Your Insta
Once the files are exported you just need to get them on your phone and post them to Instagram.
That’s it really. Hopefully, this guide will be helpful and speed up your workflow. I have in the past used apps to add the borders but it can lead to inconsistency and often they add a uniform border which doesn’t help with images of different crops.
If you have any queries please let me know in the comments.
p.s. Big thanks to the creators of the Mogrify Plugin.
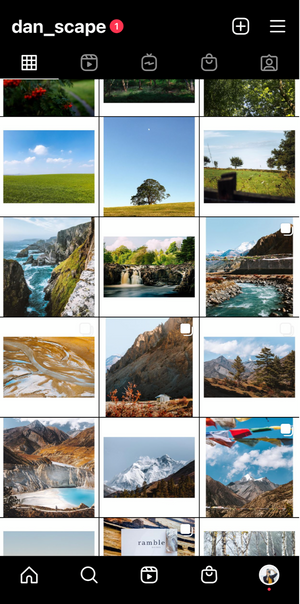
How my Instagram gallery looks with these settings.